Saturday, October 11, 2008

For Sale


Well, the house is for sale and our lives have been turned upside down. We're constantly cleaning the house to make it spotless for people coming in to see it and with people in and out of the house at various times, it's made cooking and blogging happen sporadically. Sorry, I'll try to be better about it, but for now, just keep your fingers crossed that we'll sell the house soon.

Wednesday, October 8, 2008

You Learn Something New Everyday...

I was so excited to buy a sugar pumpkin and make pumpkin puree. I actually made it and took some photos. I put it all into a mason jar, got out my immersion blender and whipped it all up into a puree and let it sit and cool off. Then I put it into the freezer because I wouldn't be using it until this weekend. Well, I looked in the freezer when I went to get something else out. It turns out that I must not have let it cool down enough. The glass broke. I had to throw out the puree so I never got to try it. I will make it again, but not until things are more settled at home. I will also post a picture or two of the puree that I made, but it may be a few days before I get the chance.
Regardless, here's how I made the puree.

1 sugar pumpkin, cut in half, stem, seeds and pulp removed

Place the pumpkin on a cookie sheet and cover each half with aluminum foil. Roast in an oven preheated to 325 degrees F for 1 to 1 1/2 hours. It will be ready when it is tender enough to easily poke with a fork. While still hot, scoop out the flesh and put into a blender or into a jar and use an immersion blender. Blend until you form a puree.
Then, as I learned, allow to fully cool before refrigerating or freezing.


As promised, here are the photos.

Sunday, October 5, 2008

A Lazy Catnap Kind of Day

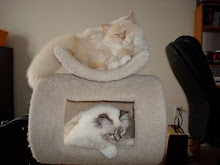
It was a busy week for us all, including Riley and Nutmeg so we were all happy to see the weekend arrive. Riley was happy to relax in the office while I did a few things on the computer and Nutmeg, who is always with me when I'm home, was there too. She hadn't seen me for most of the week, so she insisted on being as close to me as possible. This is one of the few photos I managed to take that didn't show her as a blur while she tried to climb into my lap.


Riley was missing his dad since his dad was out during the day. This is Riley's "When is Papa coming home?" look.

Riley and Nutmeg haven't always gotten along and sometimes, they still have a few spats, but Nutmeg still adores her big brother. She knows that she's not allowed to get too close to him otherwise he'll get mad. This is her getting as close to him as she can without annoying him. The expression on her face just tells you how much she wants to turn around and climb on top of Riley and give him a good ol' snuggle.

There's a first time for everything!
Yesterday was actually the first time that Riley has ever let Nutmeg sleep so close to him. Look how happy she is!

He looks pretty happy too, but shhhh, don't tell him!


Every day should be spent like this!

Friday, October 3, 2008

Pumpkin Muffins


In keeping with the season, I decided to make something from pumpkin puree. I'll admit, I used canned pumpkin this time, but I have a sugar pumpkin waiting for me to make puree out of it. I plan to make a pumpkin pie for Thanksgiving next weekend and will post about it later.
But anyway, I made pumpkin muffins and used some of the apple sauce I made earlier.

Pumpkin Spice Muffins
2 cups pumpkin puree
4 eggs
1/2 cup vegetable oil
1/2 cup apple sauce
2/3 cup water
3/4 cup white sugar
3/4 cup brown sugar
3 1/2 cups flour
2 teaspoons baking soda
2 teaspoons ground cinnamon
1 teaspoon ground nutmeg
1/2 teaspoon ground cloves
1/4 teaspoon ground ginger
1/4 teaspoon ground allspice

  1. Preheat oven to 350 degrees F. Lightly grease 2 muffin tins or line them with paper muffin cups.
  2. In the mixer bowl, combine pumpkin puree, eggs, oil, water, and the sugars until mixed together.
  3. In a separate medium-sized bowl, whisk together the flour, baking soda and spices.
  4. Stir the flour mixture into the pumpkin mixture at a slow speed and just until mixed in.
  5. Spoon into the muffin cups and bake for 30 - 35 minutes.
These are great breakfast muffins. If you like, you can add chopped nuts or dried fruit to the recipe or you can drizzle with a citrus glaze.

Sunday, September 28, 2008

Fall Cooking: Apple Sauce


Apples! There's nothing like a fresh, local apple to tell you that autumn has arrived. My favourite apple is the honeycrisp which is a large apple that is crisp and juicy. It's a slightly tart apple that's perfect for eating or baking. I decided to try apple sauce.
This is the recipe that I used, taken from Allrecipes.com.

2 apples - peeled, cored and shredded
1 teaspoon ground cinnamon
1/4 cup water
3 tablespoons brown sugar

  1. Place the apples into a medium saucepan and sprinkle the cinnamon on top. Then pour the water over the apples and cinnamon. Cook on medium low heat until the apples are mushy (approximately 20-30 minutes).
  2. Remove the saucepan from the heat and stir in the brown sugar.
This is what the ingredients look like when they have just been added to the saucepan.


This is what the apples look like when they are cooking.


This is how the apple sauce looks when it is finished. You will get about 2 or 2 1/2 cups of apple sauce.


The apple sauce can be served with pork or as a dessert either by itself or with ice cream. It would even go nicely on a warm apple pie. Mmmmm!

Thursday, September 25, 2008

Jalapeno Poppers

We went to the farmers market and were inspired by some jalapeno peppers, so we bought a basket. I brought them home and wondered what to make. Then it occurred to me...POPPERS! Here's what I made and they're absolutely delicious. (I recommend wearing gloves so that you don't get the jalapeno oil on your hands.)

Bacon-Wrapped Jalapeno Poppers
Serves 2

4             jalapeno peppers
4 to 8       tsp chive and onion cream cheese
4 slices   salt reduced bacon
4              skewers, soaked in water for 20-30 mins

  1. Preheat the BBQ to medium or preheat an oven to 350 degrees F
  2. Wash the peppers and slice them lengthwise without cutting all the way through the pepper. Then remove the seeds and membrane from inside. This will form a pocket so that you can stuff it with the cheese.
  3. Fill each pepper with 1 - 2 teaspoons of the cream cheese, depending on the size of the pepper, by using a knife to press it into the pocket of the pepper.
  4. Wrap the bacon around the pepper and then pierce all the way through with two skewers, one near the top and one near the bottom of the pepper, to hold the bacon in place and so that you can flip them more easily on the BBQ. You can put two peppers onto one skewer.
  5. Once all skewers have been prepared, place them on the grill or, if using oven method, place on a cookie sheet and cook for 10 minutes. Then flip the peppers and cook for an additional 10 minutes or until the bacon is crispy or just the way you like it. Be careful, the cheese will be really hot when you take the poppers out, so don't burn yourself on them like I did!

Tuesday, September 23, 2008

Who doesn't love pizza?

The very first thing that I learned how to make really well was pizza. My mother-in-law showed me how to make the best pizza ever and I couldn't believe how easy it was! Please forgive my photos as I'm not a great food photographer - I promise to work on it, though.


Here is the recipe:
Ingredients
1 tsp sugar
1 cup very warm water (but not boiling)
1 TBSP yeast
1/4 cup olive oil
3 1/2 cups flour
1 tsp salt

1 ball mozzarella cheese, grated

You will also need your favorite pizza or spaghetti sauce and toppings. I like bacon, onions, hot peppers, chipotle peppers and artichokes on my pizza, but you can put whatever you like.

Steps
  1. If you have a mixer that kneads dough, pour the sugar and water into the mixer bowl and stir until sugar is dissolved. If not, then use a large bowl. Once the sugar is dissolved, sprinkle the yeast over the top of the water and let sit for 5-10 mins for the yeast to activate.
  2. After the yeast has activated, pour the oil into the mixture and stir to combine. If using a mixer, now secure the bowl to the mixer and add 2 cups of the flour and begin kneading. If doing by hand, add the 2 cups of flour and stir together with your hands until the flour begins to come together.
  3. Mix the salt into the remaining 1 1/2 cups of flour (this will prevent the salt from killing the yeast) and pour the rest of the flour into the bowl. If using the mixer, let it work until you have a nice dough that is soft but not sticky, approximately 2 mins. If it is sticky, add another 1/4 cup of flour. If you are not using a mixer, begin kneading the dough to incorporate the flour. Continue kneading until you have formed a dough ball. If it is still sticky, add another 1/4 cup of flour. Continue kneading. This takes approximately 8-10 mins.
  4. After the dough has been kneaded, cover with a piece of wax paper or a damp cloth and place in a warm, draft-free place to rise for approximately one hour or until doubled in size.
  5. While the dough is rising, prepare your toppings and grate the cheese. Also, lightly grease a cookie sheet with edges.
  6. Once the dough has risen, punch it down. For a thicker crust, allow to rise again for 20-30 mins. Otherwise, move right to step 7.
  7. Preheat your oven to 410 degrees F if using a convection oven, otherwise 425 degrees. Spread the dough out evenly onto the cookie sheet. Cover the dough with your pizza or spaghetti sauce, leaving a small edge as a crust.
  8. Arrange your toppings on the pizza and cover with the grated mozzarella. Let the pizza rest for 10 mins, then bake for 22-25 mins or until golden brown. Then cut, serve and enjoy!